
【ML笔记】MacOS下的tensorflow环境配置
MacOS使用venv安装tensorflow
python3 -m venv ./venv |
MacOS使用conda安装tensorflow
Tensorflow需要安装的三个包是tensorflow-deps、tensorflow-macos、tensorflow-metal。其中前两个是必须的,tensorflow-metal是让tensorflow能用上Apple Silicon芯片的GPU。
首先创建一个新的conda环境
conda create -n tensorflow python=3.9 |
安装tensorflow
step1
# 指定定版本安装 |
step2
# 若有报错, 则执行pip install torch,然后再重新执行一遍下述命令 |
step3-安装tensorflow-metal
python -m pip install tensorflow-metal |
验证安装
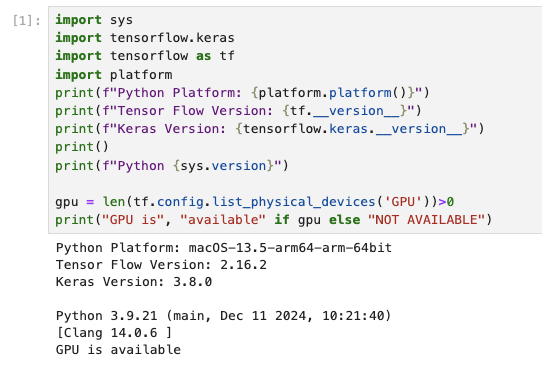
开 Python 解释器并运行以下代码,如果能够看到输出 TensorFlow 版本和 GPU 信息,说明 TensorFlow 已成功安装。
import tensorflow as tf |

import sys |
使用GPU加速
当前不支持
- 多 GPU 支持
- 英特尔 GPU 的加速
- V1 TensorFlow 网络
在配备 Apple M 芯片(如 M1、M2 系列)设备上,TensorFlow 已支持使用 GPU 加速,但与 PyTorch 的
MPS设备指定方式稍有不同。
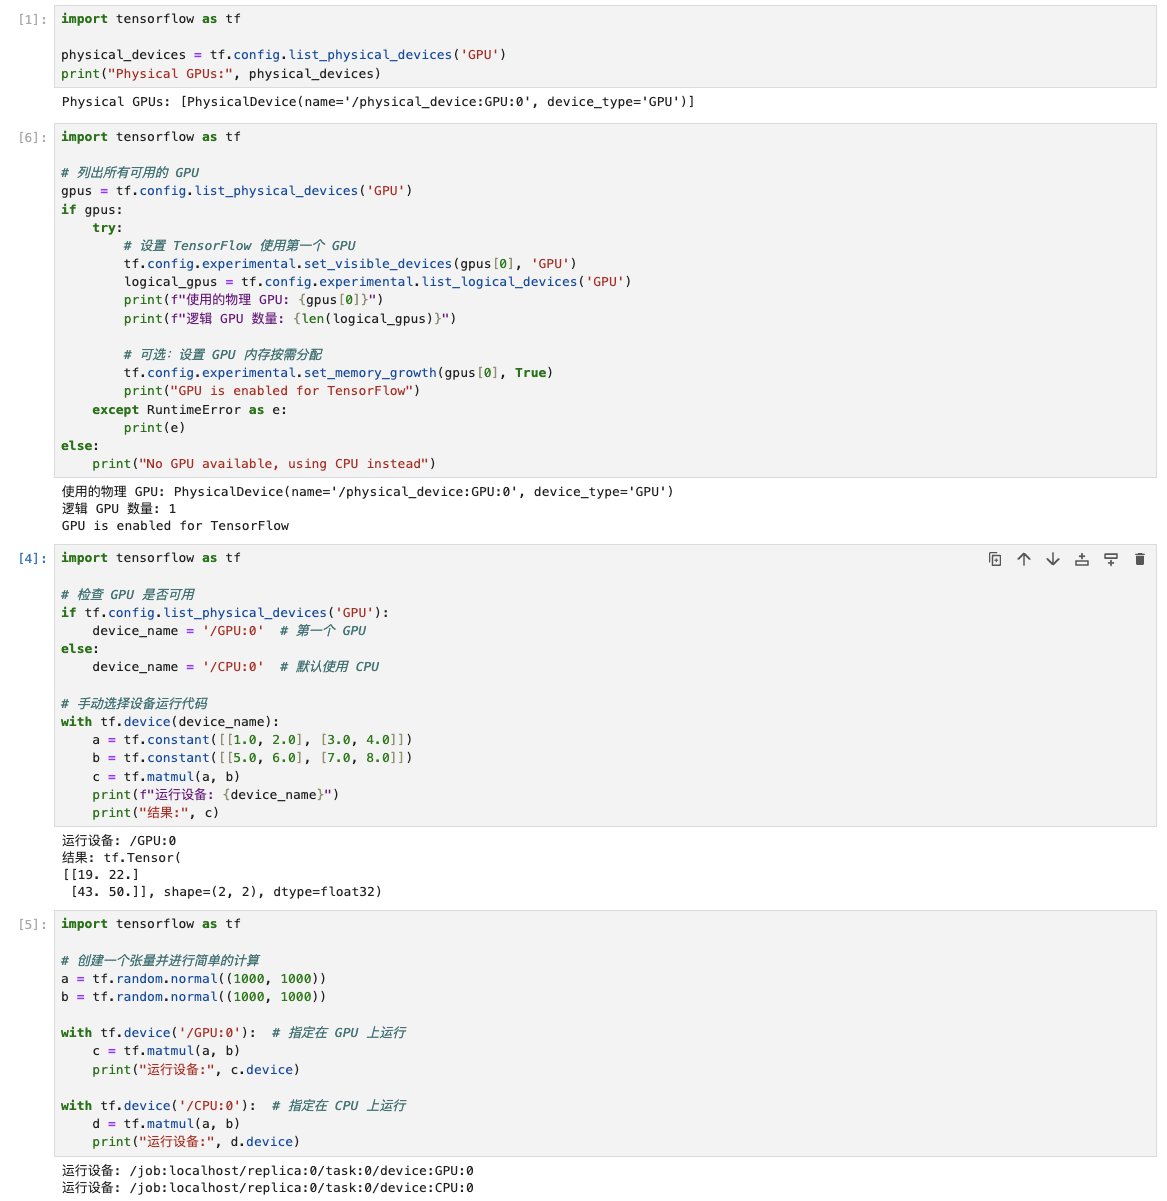
验证 GPU 支持: 在 Python 中运行以下代码,检查是否检测到 Metal 支持的 GPU:
import tensorflow as tf

physical_devices = tf.config.list_physical_devices('GPU')
print("Physical GPUs:", physical_devices)
如果配置正确,你会看到类似以下的输出:
Physical GPUs: [PhysicalDevice(name='/physical_device:GPU:0', device_type='GPU')]
在代码中选择 GPU: TensorFlow 自动会使用可用的 GPU(TensorFlow默认会自动选择可用的 GPU)。如果需要手动指定 GPU 或进行显式控制,可以使用以下代码:
import tensorflow as tf

# 列出所有可用的 GPU
gpus = tf.config.list_physical_devices('GPU')
if gpus:
    try:
        # 设置 TensorFlow 使用第一个 GPU
        tf.config.experimental.set_visible_devices(gpus[0], 'GPU')
        logical_gpus = tf.config.experimental.list_logical_devices('GPU')
        print(f"使用的物理 GPU: {gpus[0]}")
        print(f"逻辑 GPU 数量: {len(logical_gpus)}")

        # 可选:设置 GPU 内存按需分配
        tf.config.experimental.set_memory_growth(gpus[0], True)
        print("GPU is enabled for TensorFlow")
    except RuntimeError as e:
        print(e)
else:
    print("No GPU available, using CPU instead")
在代码中选择设备
在 TensorFlow 中,你也可以通过
tf.device上下文管理器指定要使用的设备:import tensorflow as tf
# 检查 GPU 是否可用
if tf.config.list_physical_devices('GPU'):
device_name = '/GPU:0' # 第一个 GPU
else:
device_name = '/CPU:0' # 默认使用 CPU
# 手动选择设备运行代码
with tf.device(device_name):
a = tf.constant([[1.0, 2.0], [3.0, 4.0]])
b = tf.constant([[5.0, 6.0], [7.0, 8.0]])
c = tf.matmul(a, b)
print(f"运行设备: {device_name}")
print("结果:", c)确认 GPU 是否加速:为了确认计算是否真的在 GPU 上运行,可以使用以下方法:
import tensorflow as tf

# 创建一个张量并进行简单的计算
a = tf.random.normal((1000, 1000))
b = tf.random.normal((1000, 1000))

with tf.device('/GPU:0'):  # 指定在 GPU 上运行
    c = tf.matmul(a, b)
    print("运行设备:", c.device)

with tf.device('/CPU:0'):  # 指定在 CPU 上运行
    d = tf.matmul(a, b)
    print("运行设备:", d.device)
你可以通过打印出的设备名(如
GPU:0或CPU:0)确认在哪个设备上运行。
运行结果如下:
tips
PyTorch 使用 MPS 的方式指定硬件设备:
if torch.backends.mps.is_available():
    device = "mps"
TensorFlow 则自动选择可用的设备(GPU > CPU),并提供手动控制接口(通过
tf.config);可以通过tf.device显式指定设备运行(TensorFlow 会自动选择最佳设备(如果支持 GPU 会优先使用))。
本博客所有文章除特别声明外,均采用 CC BY-NC-SA 4.0 许可协议。转载请注明来源 Hozenghan的博客!
相关推荐

2024-07-24
【ML笔记】MacOS下的pytorch环境配置
MacOS安装pytorch、关于Jupyter Notebook、Accelerated PyTorch training on Mac

2025-03-05
【ML笔记】数据集清洗
如何将脏数据清理干净(数据清洗的具体步骤)

2025-05-19
【算法笔记】刷题记录-week13
准备机试刷题记录。动态规划、贪心算法、STL

2025-05-11
【算法笔记】刷题记录-week12
准备机试刷题记录。动态规划

2025-03-24
【算法笔记】基础算法
准备保研推免上机考试的笔记集合

2025-03-17
【CAD/CG笔记】求控制点对应在B-Spline上的参数估计
求控制点Pi对应在B-Spline上的参数估计