最近在做信安赛(AI数字人实时检测),尝试实现真人生物特征检测,找到一篇2022年的文章,尝试复现

参考博客:

https://zhuanlan.zhihu.com/p/406470882

https://blog.csdn.net/matt45m/article/details/139467321

文章概述

一句话总结全文:从两只眼睛中提取瞳孔并分析它们的形状,可以有效区分GAN生成的人脸和真实的人像照片。

对于一个普遍意义上健全的人来说,瞳孔的形状是近乎圆形的。然而,在GAN生成的眼睛部分,可以观察到明显的伪影和不一致,如瞳孔的边界不是椭圆形的。如下图所示:

2109.00162v4_页面_1_图像_0002

真实的眼睛(左),瞳孔为明显的圆形或椭圆形(黄色);GAN生成的眼睛(右),瞳孔为不规则的形状(红色)。

这种现象普遍存在于GAN生成的人脸上,其中一个根本原因是,目前的GAN模型缺乏对人眼解剖学的理解,特别是瞳孔的几何形状。

方法复现

总结该方法:作者利用模型对两只眼睛的瞳孔进行自动提取,并在之后评估这些瞳孔的形状是否为椭圆形。

1. 瞳孔分割

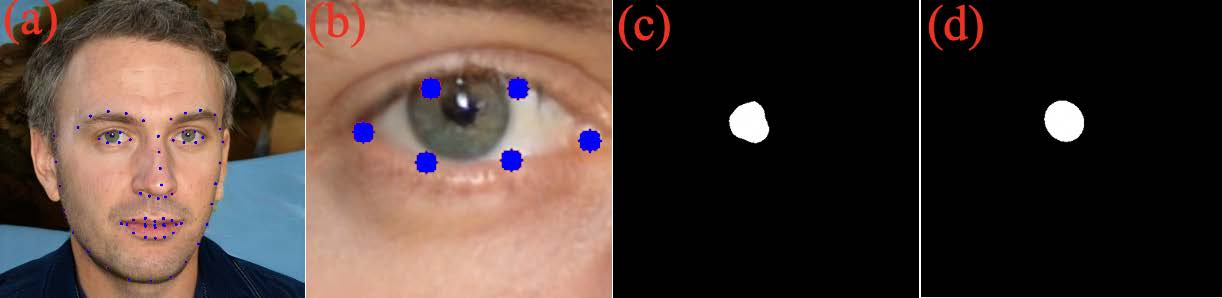
首先通过人脸检测器来定位人脸,然后用提取器获得人脸的关键点(面部特征点)(如(a)图所示)。我们需要提取瞳孔的ROI区域,故需要根据关键点裁切眼部,对两只眼睛对应的区域进行适当裁剪后可以得到(b)图。

这一步通过多媒体机器学习模型应用框架mediapipe的mediapipe face mesh来实现,该工具可以实时检测和跟踪人脸的 3D 网格关键点

关于MediaPipe Face Mesh

MediaPipe Face Mesh是一种脸部几何解决方案,即使在移动设备上,也可以实时估计468个3D脸部界标(原文提到的dlib方法只能检测出68点)。它采用机器学习(ML)来推断3D表面几何形状,只需要单个摄像机输入,而无需专用的深度传感器。该解决方案利用轻量级的模型架构以及整个管线中的GPU加速,可提供对**实时体验**至关重要的实时性能

mediapipe face mesh的github主页:https://chuoling.github.io/mediapipe/solutions/face_mesh.html

可参考博客推荐:

1.1.使用MediaPipe Face Mesh检测跟踪人脸网格关键点的示例代码一
# 调用本机摄像头实时检测
import mediapipe as mp
import numpy as np
import cv2
import time

mp_face_mesh = mp.solutions.face_mesh # 定义了一个面部网格检测器
face_mesh = mp_face_mesh.FaceMesh(static_image_mode=False,
max_num_faces=5, # Maximum number of detected faces
refine_landmarks=True, # Whether to further refine the landmark coordinates around the eyes and lips
min_detection_confidence=0.5,
min_tracking_confidence=0.5) # 定义用于初始化人脸网格模型的类

mp_drawing = mp.solutions.drawing_utils
mp_drawing_styles = mp.solutions.drawing_styles

cap = cv2.VideoCapture(1)
pTime = 0

while True:

ret, img = cap.read()
height, width, channels = np.shape(img)
img_RGB = cv2.cvtColor(img, cv2.COLOR_BGR2RGB)

results = face_mesh.process(img_RGB)

# 绘制部分
if results.multi_face_landmarks:
for face_landmarks in results.multi_face_landmarks:
# Draw a facial mesh
mp_drawing.draw_landmarks(image=img,
landmark_list=face_landmarks,
connections=mp_face_mesh.FACEMESH_TESSELATION,
landmark_drawing_spec=None,
connection_drawing_spec=mp_drawing_styles.get_default_face_mesh_tesselation_style())
# Draw facial contours
mp_drawing.draw_landmarks(image=img,
landmark_list=face_landmarks,
connections=mp_face_mesh.FACEMESH_CONTOURS,
landmark_drawing_spec=None,
connection_drawing_spec=mp_drawing_styles.get_default_face_mesh_contours_style())
# Draw iris contours
mp_drawing.draw_landmarks(image=img,
landmark_list=face_landmarks,
connections=mp_face_mesh.FACEMESH_IRISES,
landmark_drawing_spec=None,
connection_drawing_spec=mp_drawing_styles.get_default_face_mesh_iris_connections_style())
# Draw facial keypoints
if face_landmarks:
for i in range(468):
pos_x = int(face_landmarks.landmark[i].x * width)
pos_y = int(face_landmarks.landmark[i].y * height)
cv2.circle(img, (pos_x, pos_y), 3, (0, 255, 0), -1)

num_faces = len(results.multi_face_landmarks) if results.multi_face_landmarks else 0
print(f"Detected {num_faces} faces")

# 计算并显示帧率
cTime = time.time()
fps = 1 / (cTime - pTime)
pTime = cTime
cv2.putText(
img, f"FPS: {int(fps)}", (20, 70), cv2.FONT_HERSHEY_PLAIN, 5, (255, 0, 0), 5
)

cv2.imshow('faces', img)

# 按Q键退出
key = cv2.waitKey(1)
if key == ord('q'):
break

cap.release()
1.2.使用MediaPipe Face Mesh检测跟踪人脸网格关键点的示例代码一
# 检测本地视频
import mediapipe as mp
import numpy as np
import cv2
import time

mp_face_mesh = mp.solutions.face_mesh # 定义面部网格检测器
face_mesh = mp_face_mesh.FaceMesh(static_image_mode=False,
max_num_faces=5, # 最大检测到的人脸数
refine_landmarks=True, # 是否进一步细化眼睛和嘴巴周围的标记点
min_detection_confidence=0.5,
min_tracking_confidence=0.5) # 定义面部网格模型的初始化参数

mp_drawing = mp.solutions.drawing_utils
mp_drawing_styles = mp.solutions.drawing_styles

# 使用本地视频文件路径来替换
video_path = "./video/2.mp4" # 替换为你的视频文件路径
cap = cv2.VideoCapture(video_path)

# 检查视频文件是否成功打开
if not cap.isOpened():
print("Error: Could not open video.")
exit()

pTime = 0

while True:
ret, img = cap.read()

if not ret:
print("Finished processing video or error occurred.")
break

height, width, channels = np.shape(img)
img_RGB = cv2.cvtColor(img, cv2.COLOR_BGR2RGB)

results = face_mesh.process(img_RGB)

# 绘制部分
if results.multi_face_landmarks:
for face_landmarks in results.multi_face_landmarks:
# 绘制面部网格
mp_drawing.draw_landmarks(image=img,
landmark_list=face_landmarks,
connections=mp_face_mesh.FACEMESH_TESSELATION,
landmark_drawing_spec=None,
connection_drawing_spec=mp_drawing_styles.get_default_face_mesh_tesselation_style())
# 绘制面部轮廓
mp_drawing.draw_landmarks(image=img,
landmark_list=face_landmarks,
connections=mp_face_mesh.FACEMESH_CONTOURS,
landmark_drawing_spec=None,
connection_drawing_spec=mp_drawing_styles.get_default_face_mesh_contours_style())
# 绘制虹膜轮廓
mp_drawing.draw_landmarks(image=img,
landmark_list=face_landmarks,
connections=mp_face_mesh.FACEMESH_IRISES,
landmark_drawing_spec=None,
connection_drawing_spec=mp_drawing_styles.get_default_face_mesh_iris_connections_style())
# 绘制面部关键点
if face_landmarks:
for i in range(468):
pos_x = int(face_landmarks.landmark[i].x * width)
pos_y = int(face_landmarks.landmark[i].y * height)
cv2.circle(img, (pos_x, pos_y), 3, (0, 255, 0), -1)

num_faces = len(results.multi_face_landmarks) if results.multi_face_landmarks else 0
print(f"Detected {num_faces} faces")

# 计算并显示帧率
cTime = time.time()
fps = 1 / (cTime - pTime)
pTime = cTime
cv2.putText(
img, f"FPS: {int(fps)}", (20, 70), cv2.FONT_HERSHEY_PLAIN, 5, (255, 0, 0), 5
)

# 显示处理后的图像
cv2.imshow('faces', img)

# 按 Q 键退出
key = cv2.waitKey(1)
if key == ord('q'):
break

# 释放视频捕获对象
cap.release()
cv2.destroyAllWindows()
1.3.根据MediaPipe Face Mesh检测到的关键点裁切出眼部ROI区域
import mediapipe as mp
import numpy as np
import cv2
import time
import os

# 初始化MediaPipe面部网格模型
mp_face_mesh = mp.solutions.face_mesh
face_mesh = mp_face_mesh.FaceMesh(
static_image_mode=False,
max_num_faces=5,
refine_landmarks=True,
min_detection_confidence=0.5,
min_tracking_confidence=0.5
)

# 定义更精确的眼部关键点索引(参考MediaPipe官方文档)
LEFT_EYE_INDICES = [33, 7, 163, 144, 145, 153, 154, 155, 133, 173, 157, 158, 159, 160, 161, 246] # 左眼完整轮廓
RIGHT_EYE_INDICES = [362, 382, 381, 380, 374, 373, 390, 249, 263, 466, 388, 387, 386, 385, 384, 398] # 右眼完整轮廓

# 视频处理参数
VIDEO_PATH = "./video/4.mp4"
OUTPUT_DIR = "./eye_images"
SAVE_INTERVAL = 5 # 每5帧保存一次

# 创建输出目录(如果不存在)
os.makedirs(OUTPUT_DIR, exist_ok=True)

def get_eye_roi(landmarks, eye_indices, frame_width, frame_height):
"""获取眼部ROI区域并添加安全边界"""
points = []
for i in eye_indices:
landmark = landmarks.landmark[i]
x = int(landmark.x * frame_width)
y = int(landmark.y * frame_height)
points.append((x, y))

# 计算最小外接矩形
x, y, w, h = cv2.boundingRect(np.array(points))

# 添加安全边界(20%的宽度/高度)
border = int(max(w, h) * 0.2)
x = max(0, x - border)
y = max(0, y - border)
w = min(frame_width - x, w + 2*border)
h = min(frame_height - y, h + 2*border)

return (x, y, w, h)

def crop_to_square(image):
"""将图像裁剪为1:1比例(正方形)"""
height, width = image.shape[:2]
if height == width:
return image
# 计算裁剪区域
size = min(height, width)
start_x = (width - size) // 2
start_y = (height - size) // 2
return image[start_y:start_y+size, start_x:start_x+size]

def safe_save_image(image, path):
"""安全保存图像,处理可能的异常"""
try:
if image.size == 0:
print(f"警告: 尝试保存空图像到 {path}")
return
cv2.imwrite(path, image) # 保存为PNG格式,PNG格式无需额外参数
except Exception as e:
print(f"保存图像错误 {path}: {str(e)}")

# 初始化视频捕获
cap = cv2.VideoCapture(VIDEO_PATH)
if not cap.isOpened():
raise FileNotFoundError(f"无法打开视频文件 {VIDEO_PATH}")

# 获取视频信息
fps = cap.get(cv2.CAP_PROP_FPS)
frame_width = int(cap.get(cv2.CAP_PROP_FRAME_WIDTH))
frame_height = int(cap.get(cv2.CAP_PROP_FRAME_HEIGHT))
print(f"视频信息: {frame_width}x{frame_height} @ {fps:.2f} FPS")

pTime = 0
frame_count = 0
save_counter = 0

while True:
ret, frame = cap.read()
if not ret:
break

# 转换颜色空间
img_RGB = cv2.cvtColor(frame, cv2.COLOR_BGR2RGB)
results = face_mesh.process(img_RGB)

if results.multi_face_landmarks:
for face_id, face_landmarks in enumerate(results.multi_face_landmarks):
# 获取眼部ROI
left_roi = get_eye_roi(face_landmarks, LEFT_EYE_INDICES, frame_width, frame_height)
right_roi = get_eye_roi(face_landmarks, RIGHT_EYE_INDICES, frame_width, frame_height)

# 裁剪眼部区域
left_eye = frame[left_roi[1]:left_roi[1]+left_roi[3], left_roi[0]:left_roi[0]+left_roi[2]]
right_eye = frame[right_roi[1]:right_roi[1]+right_roi[3], right_roi[0]:right_roi[0]+right_roi[2]]

# 将眼部图像裁剪为1:1比例
left_eye_square = crop_to_square(left_eye)
right_eye_square = crop_to_square(right_eye)

# 定期保存(每SAVE_INTERVAL帧)
if frame_count % SAVE_INTERVAL == 0:
timestamp = int(time.time() * 1000)
left_path = os.path.join(OUTPUT_DIR, f"face_{face_id}_left_{frame_count}.png") # 改为PNG格式
right_path = os.path.join(OUTPUT_DIR, f"face_{face_id}_right_{frame_count}.png") # 改为PNG格式
safe_save_image(left_eye_square, left_path)
safe_save_image(right_eye_square, right_path)
save_counter += 2

# 显示帧率
cTime = time.time()
fps = 1 / (cTime - pTime)
pTime = cTime
cv2.putText(frame, f"FPS: {int(fps)}", (20, 70), cv2.FONT_HERSHEY_SIMPLEX, 1, (0, 255, 0), 2)

# 显示处理结果
cv2.imshow('Face Mesh Detection', frame)

# 退出条件
if cv2.waitKey(1) & 0xFF == ord('q'):
break

frame_count += 1

# 释放资源
cap.release()
cv2.destroyAllWindows()
print(f"处理完成,共保存 {save_counter} 张眼部图像")

结果实例如下,

2.边界检测

获得眼部的ROI后,使用EyeCool提取瞳孔的掩码及其边界。

github源码:https://github.com/neu-eyecool/NIR-ISL2021?tab=readme-ov-file

EyeCool是一个改进的基于U-Net的模型,可以同时对瞳孔和虹膜、内部和外部边界进行分割。其中EfficientNet-B5被用作编码器,并在解码器中添加了一个边界注意块,以提高模型关注物体边界的能力。此外,Dice损失和MSE损失都被用来训练模型,其中Dice损失被用来评估分割部分,MSE被用来计算边界热图的回归损失。

关于EyeCool的一个比赛NIR-ISL-2021:https://sites.google.com/view/nir-isl2021/home、https://github.com/xiamenwcy/NIR-ISL-2021

直接使用EyeCool的开源预训练模型以及CASIA-Iris-Africa数据集能够将论文中给出的人脸(a)的瞳孔掩码(c)检测出,但是更换人脸后效果不佳

开源预训练模型下载(提取码:x3zm):https://pan.baidu.com/share/init?surl=1zHhHryzhOhfJJ8NEPlv-g

2.1.示例代码

实例代码见github仓库neu-eyecool,测试模型文件位于example/model_performance.py中。结果如下

另附命令:

python example/model_performance.py --dataset CASIA-Iris-Africa --ckpath yourPathToPTHFile

# 例如
python example/model_performance.py --dataset CASIA-Iris-Africa --ckpath ./submission_1-checkpoints/afc-checkpoints

3.椭圆拟合瞳孔

原文中提到椭圆拟合的瞳孔时利用基于最小平方的椭圆拟合方法可用于预测瞳孔掩码的外部边界,以估计椭圆拟合的瞳孔边界。

$u$为预测的瞳孔掩码的外边界上的点的坐标,利用最小二乘法找到一组参数$θ$,使数据点和椭圆之间的距离测量最小:

$$
F(u; \theta) = \theta \cdot u = ax^2 + bxy + cy^2 + dx + ey + f = 0
$$
并通过最小化N个数据点上的代数距离平方之和来确定椭圆的大小:
$$
\mathcal{D}(\theta) = \sum_{i=1}^{N} F(u_i; \theta_i)^2, \ \text{subject to} \ |\theta|^2 = 1 \quad (1)
$$
但是阅读EyeCool的源码后发现:执行example/model_performance.py代码时,EyeCool提取瞳孔的掩码后会调用location/post_process.py文件从预测的瞳孔/虹膜掩码(mask)中提取椭圆边界,故最小平方拟合好像可以重新不用手写新的代码?

4.估算瞳孔形状的不规则性

本文作者使用BIoU来评估距离瞳孔外边界d像素范围内的瞳孔掩码像素。

Boundary IoU(BIoU)可以用来对边界质量敏感的图像分割。相比于平等对待所有像素的Mask IoU,BIoU计算的是预测和基准真相之间的边界轮廓在一定距离内掩码像素的IoU。

借用知乎的图,其中P表示预测的瞳孔掩码,F表示椭圆的瞳孔掩码,参数d是距离边界的距离,控制测量对边界的敏感性。

img
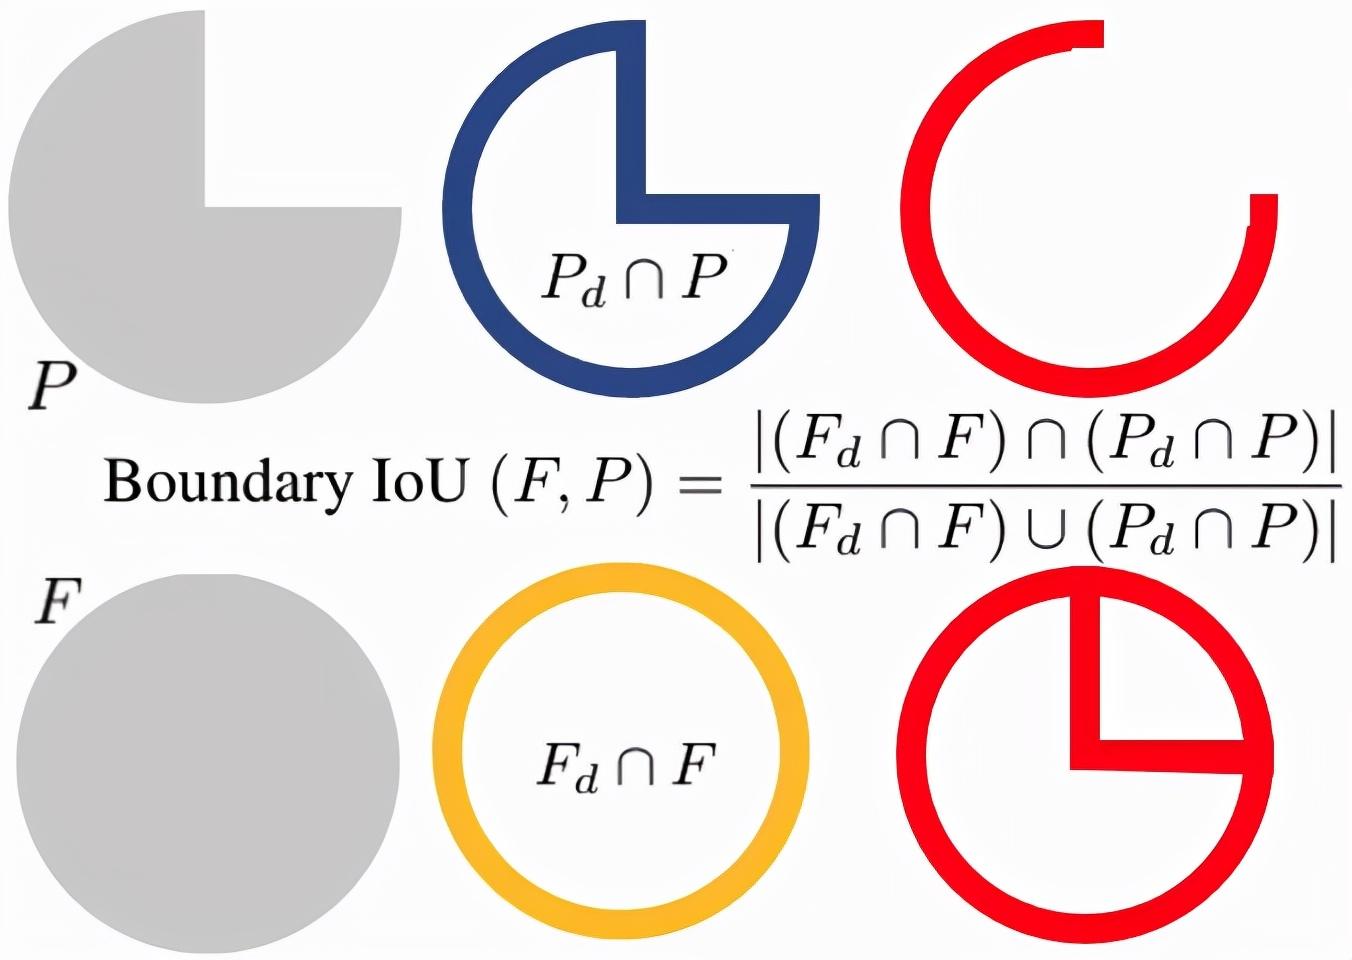
  • 左:预测的瞳孔掩码P和椭圆的瞳孔掩码F;
  • 中:Pd和Fd是距离边界d以内的掩码像素(蓝色和黄色);
  • 右:预测的瞳孔掩码和椭圆修正的瞳孔掩码的距离参数d之间的边界IoU计算。

此外,当把d放大到足以包括掩码内的所有像素时,BIoU就等于掩码IoU。为了使BIoU对边界质量更加敏感,可以减少参数d以忽略掩码内部像素。预测的瞳孔掩码和椭圆的瞳孔掩码之间的BIoU得分的范围是[0, 1],较大的值表明瞳孔的边界与椭圆的形状更相似,那么人脸也更可能是真实的;否则就是用GAN模型生成的。

4.1.BIoU基础知识

BIoU原文:Boundary IoU: Improving Object-Centric Image Segmentation Evaluation

参考中文博客:

https://blog.csdn.net/weixin_50476352/article/details/116615065

https://zhuanlan.zhihu.com/p/395498780

BIoU开源code:

https://blog.csdn.net/HaoZiHuang/article/details/125613577

4.2.开源代码部分
# General util function to get the boundary of a binary mask.
# 该函数用于获取二进制 mask 的边界
def mask_to_boundary(mask, dilation_ratio=0.02):
"""
Convert binary mask to boundary mask.
:param mask (numpy array, uint8): binary mask
:param dilation_ratio (float): ratio to calculate dilation = dilation_ratio * image_diagonal
:return: boundary mask (numpy array)
"""
h, w = mask.shape
img_diag = np.sqrt(h ** 2 + w ** 2) # 计算图像对角线长度
dilation = int(round(dilation_ratio * img_diag))
if dilation < 1:
dilation = 1

mask = mask.astype(np.uint8)
# Pad image so mask truncated by the image border is also considered as boundary.
new_mask = cv2.copyMakeBorder(mask, 1, 1, 1, 1, cv2.BORDER_CONSTANT, value=0)
kernel = np.ones((3, 3), dtype=np.uint8)
new_mask_erode = cv2.erode(new_mask, kernel, iterations=dilation)

# 因为之前向四周填充了0, 故而这里不再需要四周
mask_erode = new_mask_erode[1 : h + 1, 1 : w + 1]

# G_d intersects G in the paper.
return mask - mask_erode


def boundary_iou(gt, dt, dilation_ratio=0.005, cls_num=2):
"""
Compute boundary iou between two binary masks.
:param gt (numpy array, uint8): binary mask
:param dt (numpy array, uint8): binary mask
:param dilation_ratio (float): ratio to calculate dilation = dilation_ratio * image_diagonal
:return: boundary iou (float)
"""
# 注意 gt 和 dt 的 shape 不一样
# gt = gt[0, 0]
# dt = dt[0]

# 这里为了让 gt 和 dt 变为 (h, w) 而不是 (1, h, w) 或者 (1, 1, h, w)

# 注意这里的类别转换主要是为了后边计算边界
# gt = gt.numpy().astype(np.uint8)
# dt = dt.numpy().astype(np.uint8)

gt = gt.astype(np.uint8)
dt = dt.astype(np.uint8)

boundary_iou_list = []
for i in range(cls_num):

gt_i = (gt == i)
dt_i = (dt == i)

gt_boundary = mask_to_boundary(gt_i, dilation_ratio)
dt_boundary = mask_to_boundary(dt_i, dilation_ratio)
intersection = ((gt_boundary * dt_boundary) > 0).sum()
union = ((gt_boundary + dt_boundary) > 0).sum()
if union < 1:
boundary_iou_list.append(0)
continue
boundary_iou = intersection / union
boundary_iou_list.append( boundary_iou )

return np.array(boundary_iou_list)

5.完整整合上述分布代码

代码如下,

import os
import argparse
import pandas as pd
import numpy as np
import cv2
import torch
from torch.autograd import Variable
from torch.utils.data import DataLoader
import torchvision.transforms as transforms
import sys
sys.path.append('./') # change as you need
from datasets import nirislDataset
from models import EfficientUNet
from location import get_edge

def mask_to_boundary(mask, dilation_ratio=0.02):
mask = mask.astype(np.uint8) # 先把 mask 转换成 uint8 类型
h, w = mask.shape
img_diag = np.sqrt(h ** 2 + w ** 2)
dilation = max(int(round(dilation_ratio * img_diag)), 1)
new_mask = cv2.copyMakeBorder(mask, 1, 1, 1, 1, cv2.BORDER_CONSTANT, value=0)
kernel = np.ones((3, 3), dtype=np.uint8)
new_mask_erode = cv2.erode(new_mask, kernel, iterations=dilation)
return mask - new_mask_erode[1:h+1, 1:w+1]

def boundary_iou(gt, dt, dilation_ratio=0.02):
gt_boundary = mask_to_boundary(gt, dilation_ratio)
dt_boundary = mask_to_boundary(dt, dilation_ratio)
intersection = ((gt_boundary * dt_boundary) > 0).sum()
union = ((gt_boundary + dt_boundary) > 0).sum()
return intersection / union

def get_args():
parser = argparse.ArgumentParser(description='Test parameters')
parser.add_argument('--dataset', required=True, type=str, dest='dataset_name')
parser.add_argument('--ckpath', required=True, type=str, dest='checkpoints_path')
return parser.parse_args()

def check_mkdir(dir_name):
if not os.path.exists(dir_name):
os.mkdir(dir_name)

def test(test_loader, net, save_dir):
print('Start testing...')
names, pupil_bious = [], []

state_dict = torch.load(os.path.join(test_args['checkpoints_path'], 'for_inner.pth'), map_location=device)
state_dict["module.heatmap4.loc.0.weight"] = state_dict.pop('module.loc4.loc.0.weight')
state_dict["module.heatmap3.loc.0.weight"] = state_dict.pop('module.loc3.loc.0.weight')
state_dict["module.heatmap2.loc.0.weight"] = state_dict.pop('module.loc2.loc.0.weight')
state_dict["module.heatmap4.loc.0.bias"] = state_dict.pop('module.loc4.loc.0.bias')
state_dict["module.heatmap3.loc.0.bias"] = state_dict.pop('module.loc3.loc.0.bias')
state_dict["module.heatmap2.loc.0.bias"] = state_dict.pop('module.loc2.loc.0.bias')

net.load_state_dict(state_dict)
net.eval()

for i, data in enumerate(test_loader):
image_name, image = data['image_name'][0], data['image']
print(f'Testing {i+1}-th image: {image_name}')
image = Variable(image).to(device)

with torch.no_grad():
outputs = net(image)

pred_pupil_circle_mask, pred_pupil_egde, pupil_circles_param = get_edge(outputs['pred_pupil_mask'])
pred_pupil_mask = outputs['pred_pupil_mask'][0,0].cpu().numpy() > 0
gt_pupil_mask = pred_pupil_circle_mask[0,0].cpu().numpy() > 0
b_iou = boundary_iou(gt_pupil_mask, pred_pupil_mask)
pupil_bious.append(b_iou)
names.append(image_name)

results_path = os.path.join(save_dir, 'pupil_biou_results.xlsx')
pd.DataFrame({'name': names, 'pupil_BIoU': pupil_bious}).to_excel(results_path)
print('Test done!')

def main(test_args):
net = EfficientUNet(num_classes=3).to(device)
net = torch.nn.DataParallel(net)
test_dataset = nirislDataset(test_args['dataset_name'], mode='test')
test_loader = DataLoader(test_dataset, batch_size=1, drop_last=False)

save_dir = os.path.join('test-result', test_args['dataset_name'])
check_mkdir(save_dir)
test(test_loader, net, save_dir)

if __name__ == '__main__':
args = get_args()
test_args = {'dataset_name': args.dataset_name, 'checkpoints_path': args.checkpoints_path}
device = torch.device("cuda" if torch.cuda.is_available() else "cpu")
main(test_args)

最后得到的BIoU值存在test_result/pupil_biou_results.xlsx内。

优化方向

该论文的方法和已有开源模型好像只在论文给出的图片中效果较好,在自己尝试的图片和视频中效果欠佳,需要优化。

  • 重新训练EyeCool模型?(😭好像不现实)
  • 再找别的真人生物特征检测开源代码